
Why do this?
Pi-hole is a DNS server you can run on your home network. By managing your own DNS, you get the power to filter internet traffic for every device you own. We are going to focus on using it to block ads, which makes browsing a lot cleaner.
How does Pi-hole work?
Think of a DNS server as the phone book of the internet. DNS stands for Domain Name System, and its job is to match a domain name to an IP address. This is why you can type google.com into your browser instead of a long string of numbers.
When you head to a website, your computer asks a DNS server for the right IP address. Once it has that, it connects to the web server and pulls down the page. You can find a more detailed breakdown of how this works on Cloudflare’s site.
What you need to follow along
- A desktop or laptop
- An Ethernet cord for your server
You will also need one of these:
- An old laptop or computer with a USB flash drive
- An Orange Pi 3 LTS with an SD card and reader
- A Raspberry Pi with an SD card and reader
An Ethernet cord isn’t strictly required if you have Wi-Fi, but since this server needs to stay up all the time, a wired connection is much more reliable.
Installing Ubuntu Server
First, we need to get Ubuntu Server installed.
If you are using an old computer, go to https://ubuntu.com/download/server and grab the version you need.
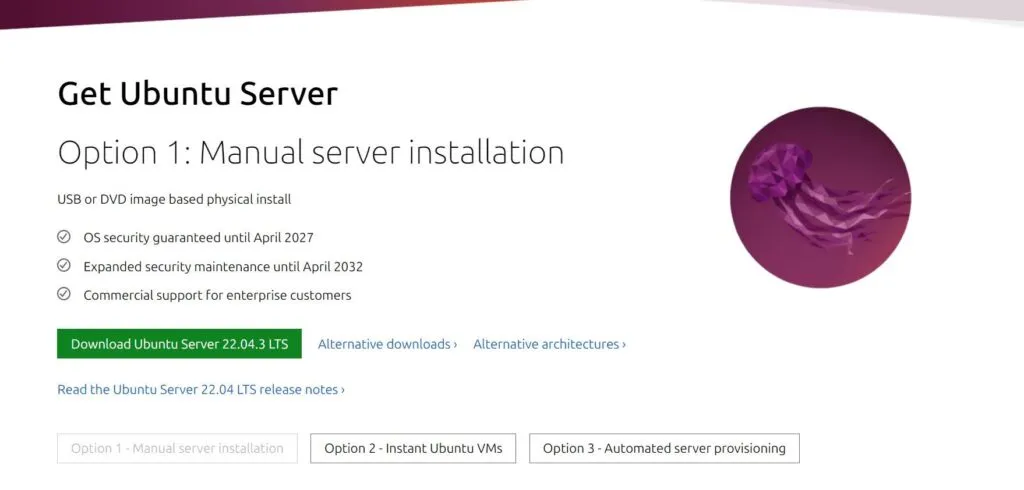
The version recommended by the green button works for most people. If you are using something like an ARM-based system, look for the correct version in the alternate downloads section.
If you are using an Orange Pi or Raspberry Pi, head over to their respective sites: Orange Pi or Raspberry Pi.
For Raspberry Pi users, the official imager tool is the easiest way to go.
For the Orange Pi, pick your specific hardware first. I am using the Orange Pi 3 LTS. Their downloads are hosted on Google Drive, so just double check that you are grabbing a 64-bit Ubuntu Server image.
Flashing the USB or SD Card
If you are on a Raspberry Pi, choose the 64-bit Raspberry Pi OS Lite. Before you hit flash, open the settings to enable SSH and set your username and password. After that, select your SD card and you are good to go.
The Orange Pi and standard Ubuntu downloads use OS images that require a tool like balenaEtcher. You can get that at https://etcher.balena.io/. Just select your image, pick your drive, and flash it.
Powering on the Server
If you are using an old computer, you might need to plug in a keyboard and monitor for the initial setup. Once that is done, plug in your Ethernet cord and make sure SSH is enabled. This guide can help if you get stuck. It is also a good idea to write down the IP address now.
For Raspberry Pi or Orange Pi users, you can usually skip the monitor and keyboard. Just plug in the power and Ethernet and let it boot up.
Finding the Server IP Address
To connect to the server, we need its IP address. The easiest way to find it is by logging into your router. Your router uses DHCP to hand out IP addresses to everything on your network, so we can find our server in that list. This is also where we can tell the router to always give the server the same IP address.
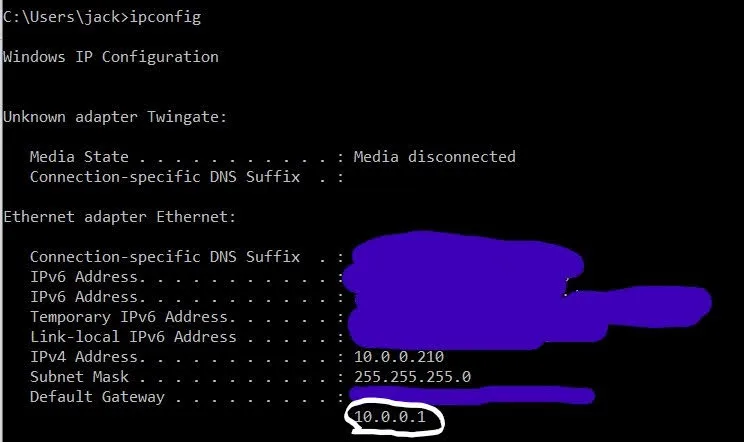
To find your router’s IP, run ipconfig in the Windows command prompt or ifconfig on a Mac. Look for the “default gateway” on Windows or “inet” on Mac.
Paste that IP into your browser to open your router’s settings. If you have an Xfinity router, the default login is usually admin and password. If that doesn’t work, check the sticker on your router or look up the model number online.
Once you are in, look for a section called “Connected Devices” or “DHCP Clients.” Every router looks a bit different.
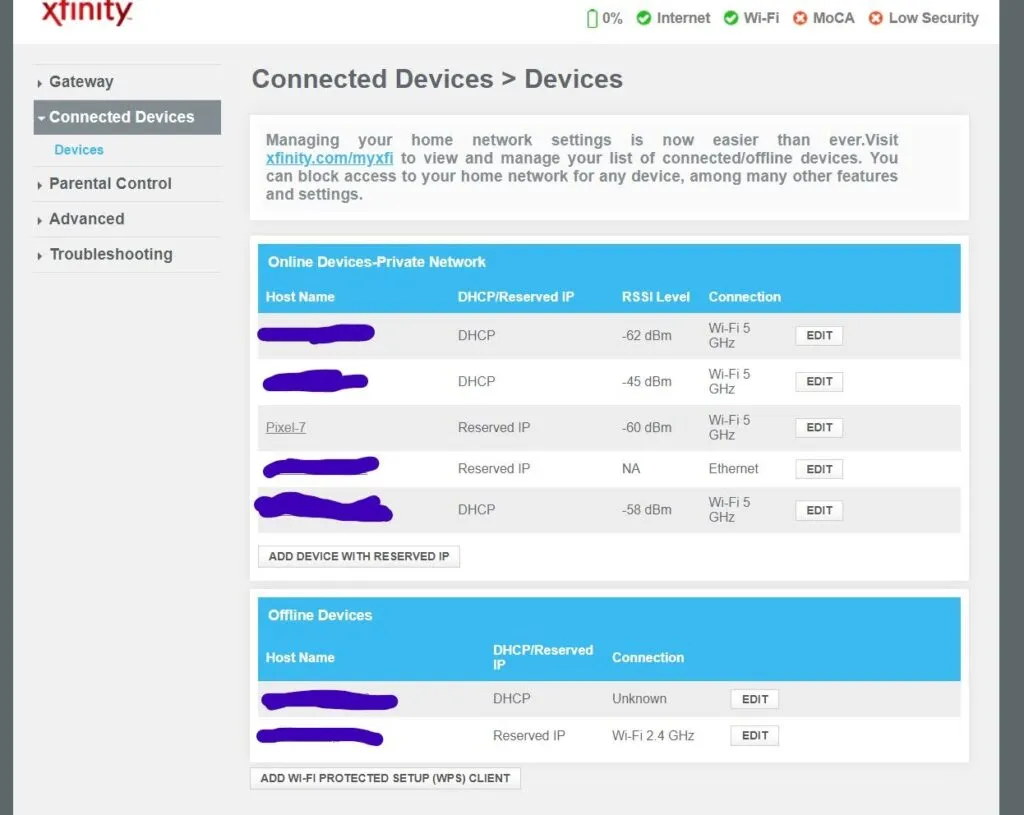
In my case, I have to click “Edit” to see the IP address. This is a great time to hit the “reserve” button. This ensures your server always stays at the same address so you don’t have to go hunting for it later.
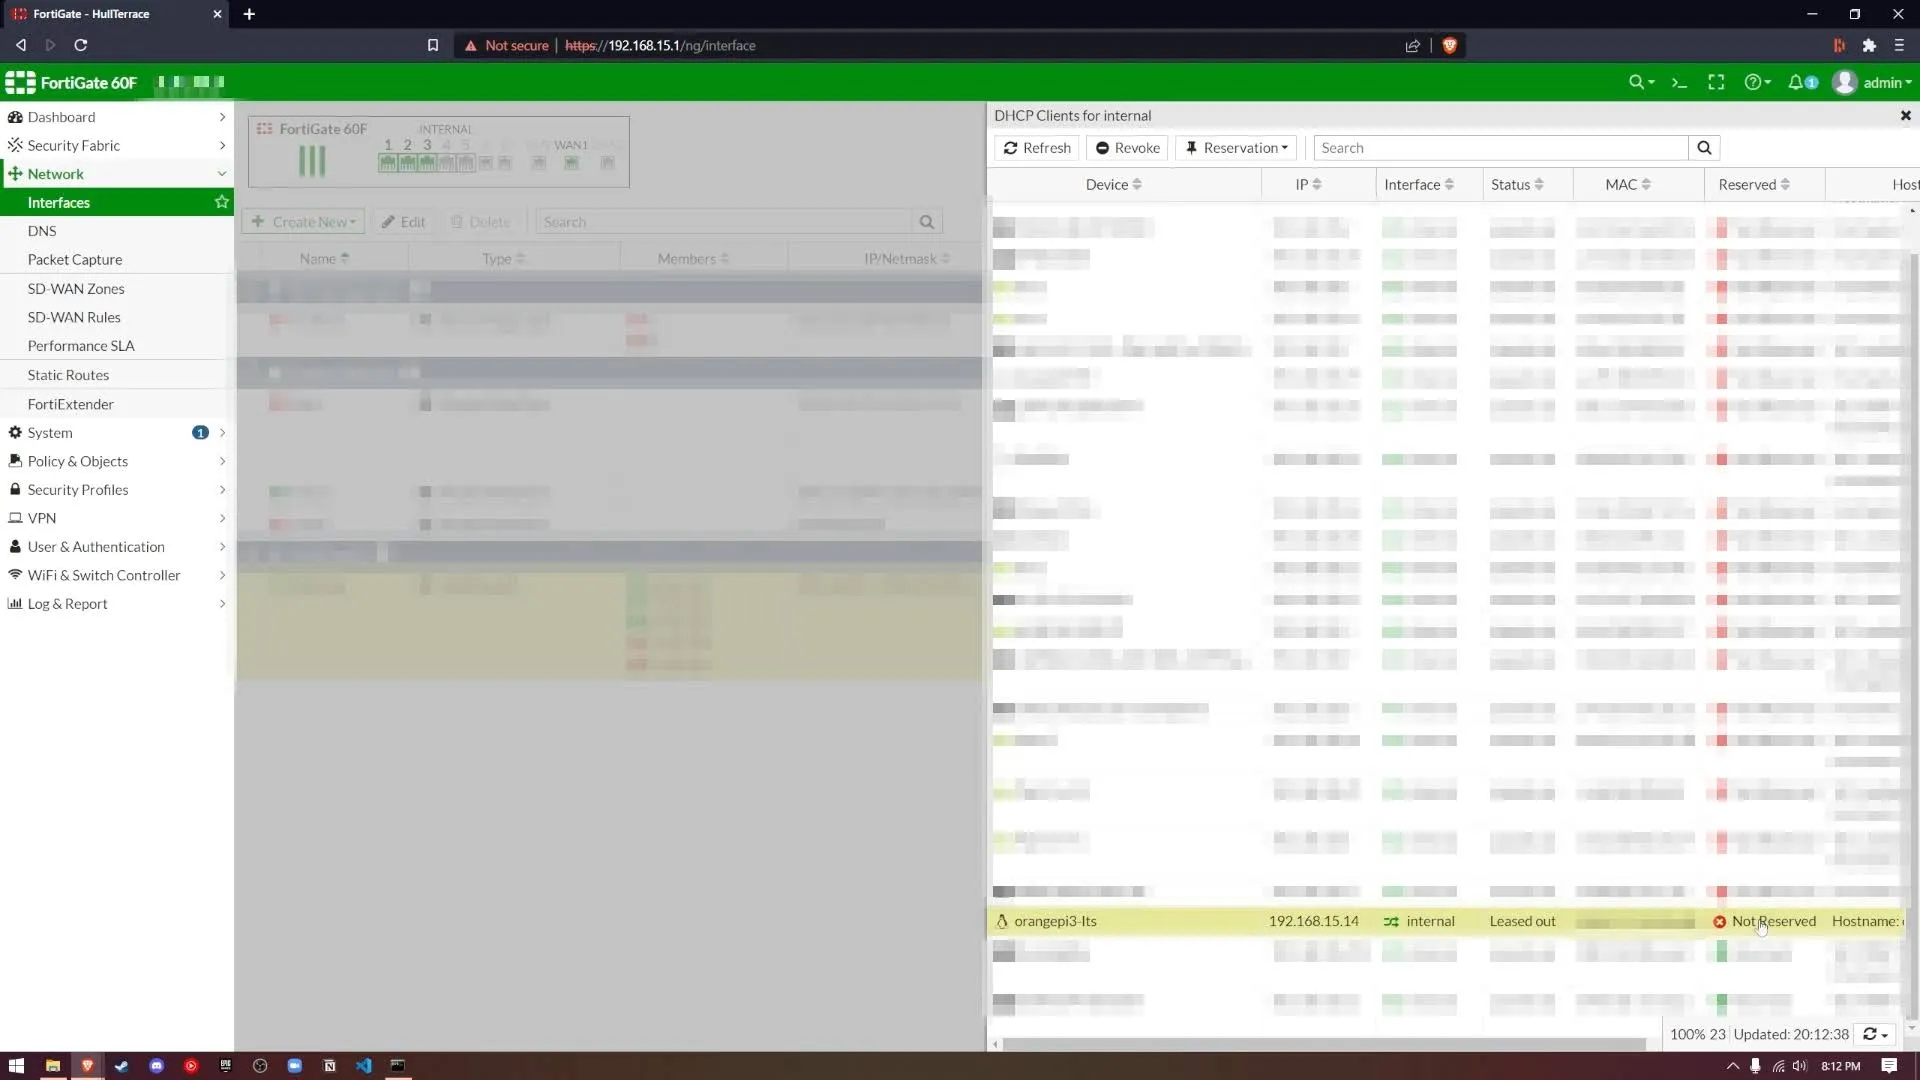
The Orange Pi or Raspberry Pi should be easy to spot in the list. Make sure to write down that IP address.
Connecting to the Server
Now we can connect using SSH. Open your terminal or command prompt and type:
ssh username@ip_addressIf you are using an Orange Pi, the default username is “orangepi.” For a Raspberry Pi, use the name you set in the imager. My command looks like this:
ssh orangepi@192.168.15.14After you connect, type “yes” for the fingerprint prompt and enter your password. The default password for Orange Pi is also “orangepi.”
The first thing you should do is change that password to something secure by running:
passwdNext, we need to handle a small conflict. Ubuntu Server runs its own DNS service by default, but since we want to run Pi-hole on port 53, we have to turn the default one off. Run these commands:
sudo systemctl disable systemd-resolvedsudo systemctl stop systemd-resolvedSince we just turned off the server’s way of finding websites, we need to manually set a temporary DNS server. Open the configuration file:
nano /etc/resolv.confFind the “nameserver” line and change the IP to something like 1.1.1.1 (Cloudflare’s DNS). We can change this back to a local address once Pi-hole is running.
Docker Installation
First, we need to update our lists of available packages to make sure we install the latest version:
sudo apt updateThen, install Docker with this command:
sudo apt install docker.ioInstalling Portainer
Portainer gives us a nice web interface to manage our Docker containers so we don’t have to stay in the command line forever. Their official documentation is very straightforward if you want to see the details.
Connecting to Portainer
Open your browser and go to:
https://ip_address:9443For me, that is
https://192.168.15.14:9443You have to use HTTPS and port 9443 for this to work. You will be asked to create an admin account, so make sure you save those credentials.
Setting up Pi-hole in Portainer
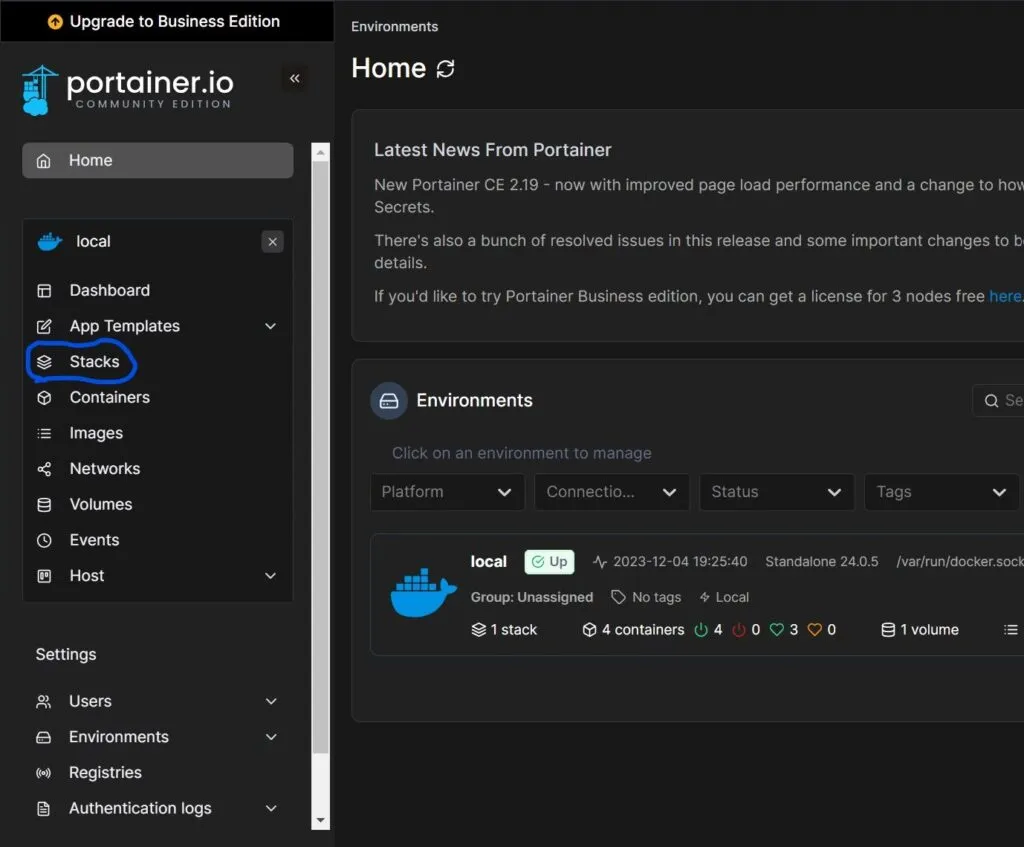
In the Portainer dashboard, click on “Stacks” under the “Local” section.
A stack is just a way to run a group of containers using a configuration file. Click ”+ add stack” and give it a name like “Pihole.” You can find the configuration file I use on my GitHub. You can look at the official Pi-hole Docker repository here: https://github.com/pi-hole/docker-pi-hole, for their directions for deployment as well. I recommend using mine because I have already adjusted the ports and password settings. Paste that content into the web editor.
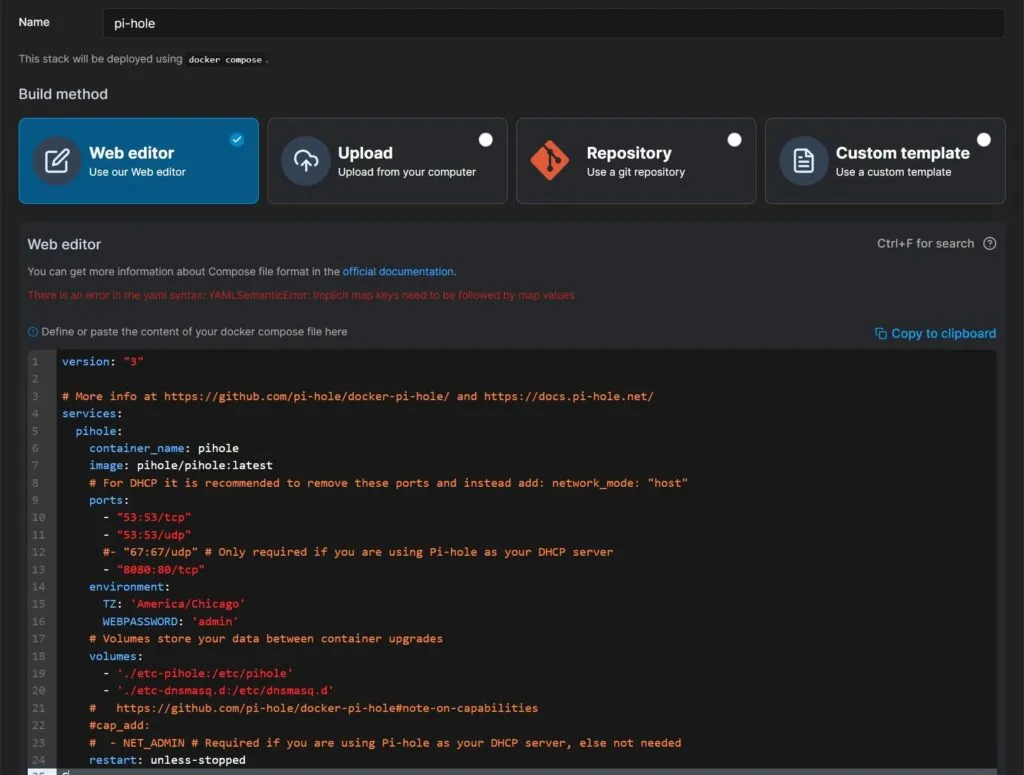
In that stack file, look for the WEBPASSWORD field. This will be your login for the Pi-hole dashboard. I also suggest using port 8080 for the web interface as shown in my GitHub file. If you ever forget your password, you can just update the stack and redeploy it.
If you want to learn more about how these files work, this video is a great introduction to Docker Compose. Otherwise you can refer to the official docker compose documentation.
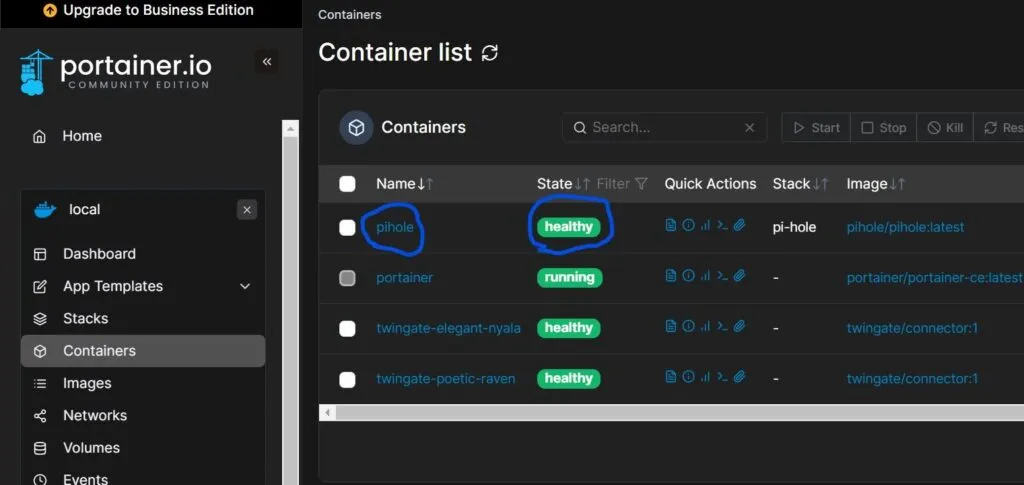
Once everything is pasted in, hit “Deploy” at the bottom. It might take a minute to download everything and start up. You can check the “Containers” section to make sure it shows as healthy.
Connecting to Pi-hole
Now you can access the Pi-hole admin page at:
http://ip_address:8080/adminSo in my case, it would look like this:
http://192.168.15.14:8080/adminLog in with the password you set in the stack configuration.
Updating the Blocklist
The dashboard shows you how many domains are currently being blocked. It comes with some defaults, but we can add more. Firebog has a great list of maintained blocklists. I usually stick to the ones highlighted in green.
In Pi-hole, go to the “Adlists” tab.
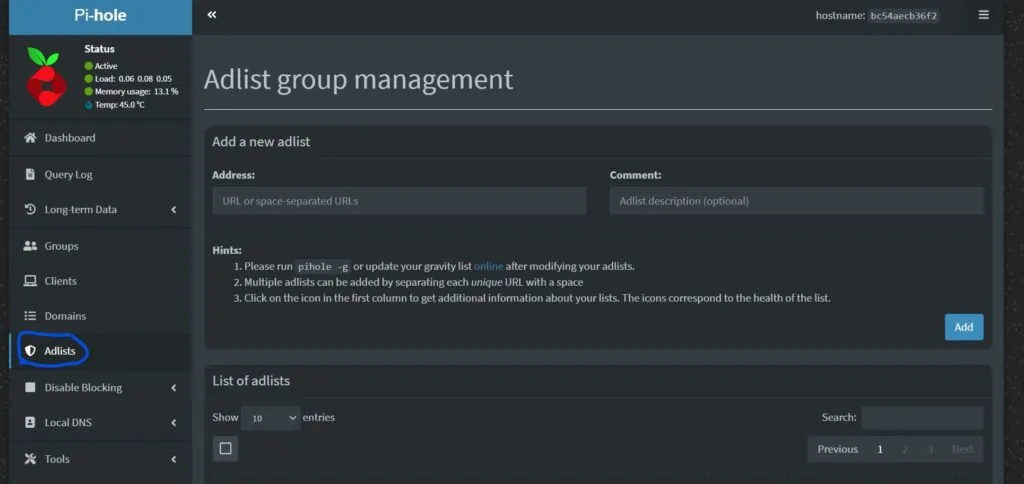
Then we can navigate to firebog.net and grab the lists we want. In this example, I will just add the advertising lists. Highlight the URLs with checkmarks by them like so:
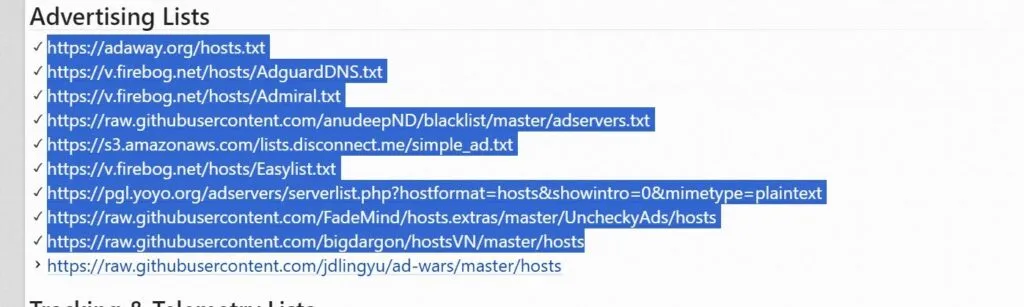
Highlight the links with checkmarks by them and copy them.
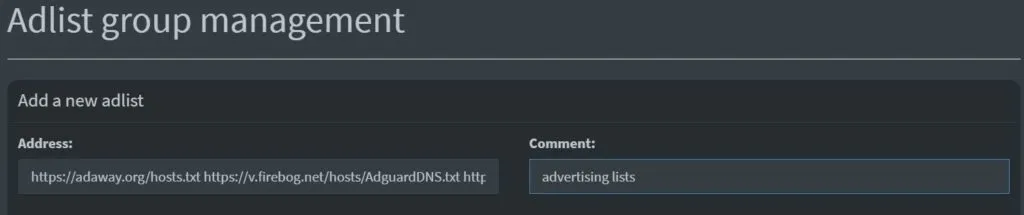
Then paste them in the text box labeled “Address”. In the text box next to it labeled “Comment”, type “advertising lists”. It should look like the following:
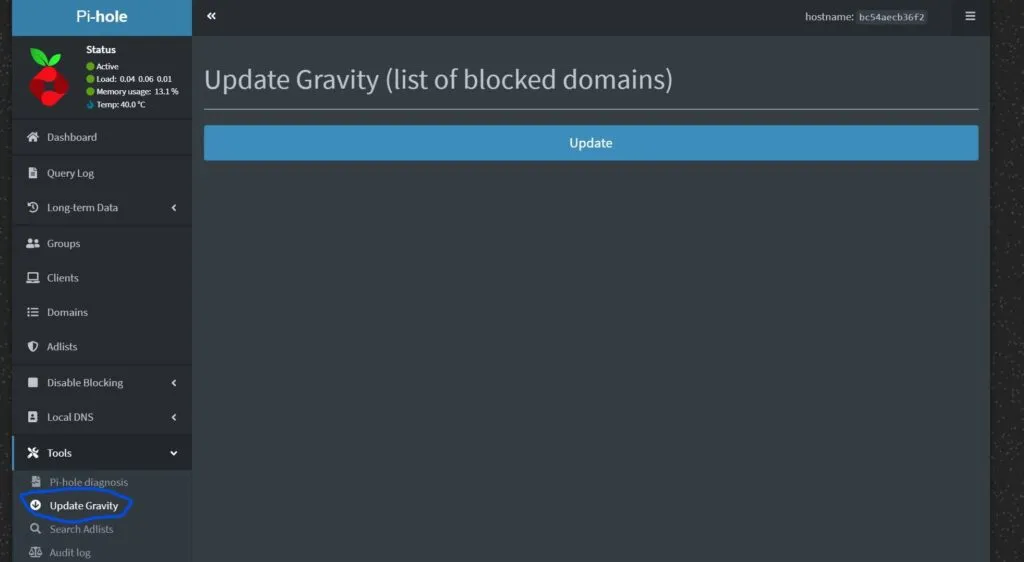
Click “Add,” but remember that Pi-hole hasn’t actually downloaded the lists yet. To do that, go to “Tools” and then “Update Gravity.”
Configuring Your Computer to Use Pi-hole
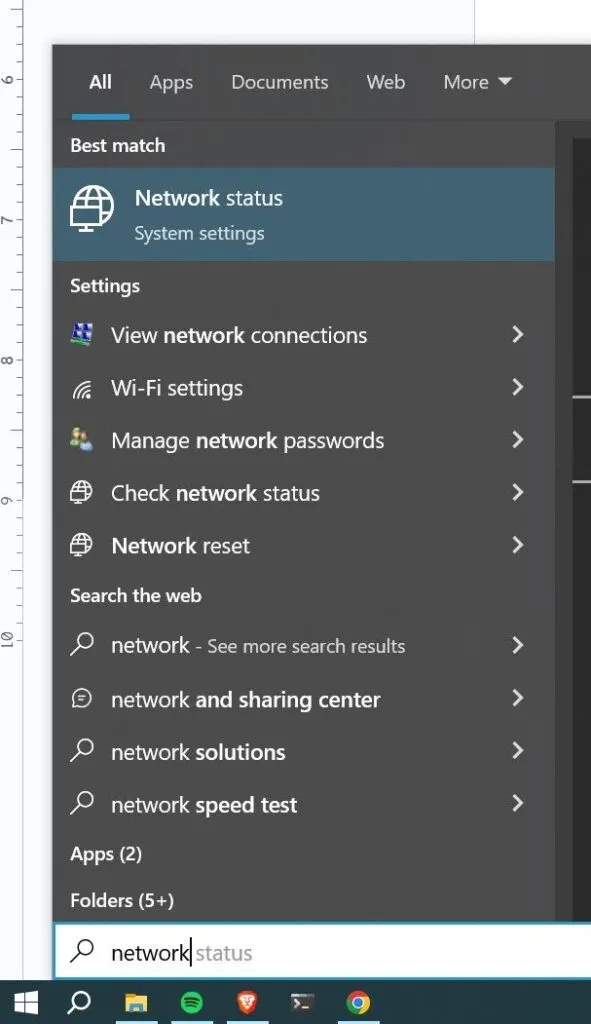
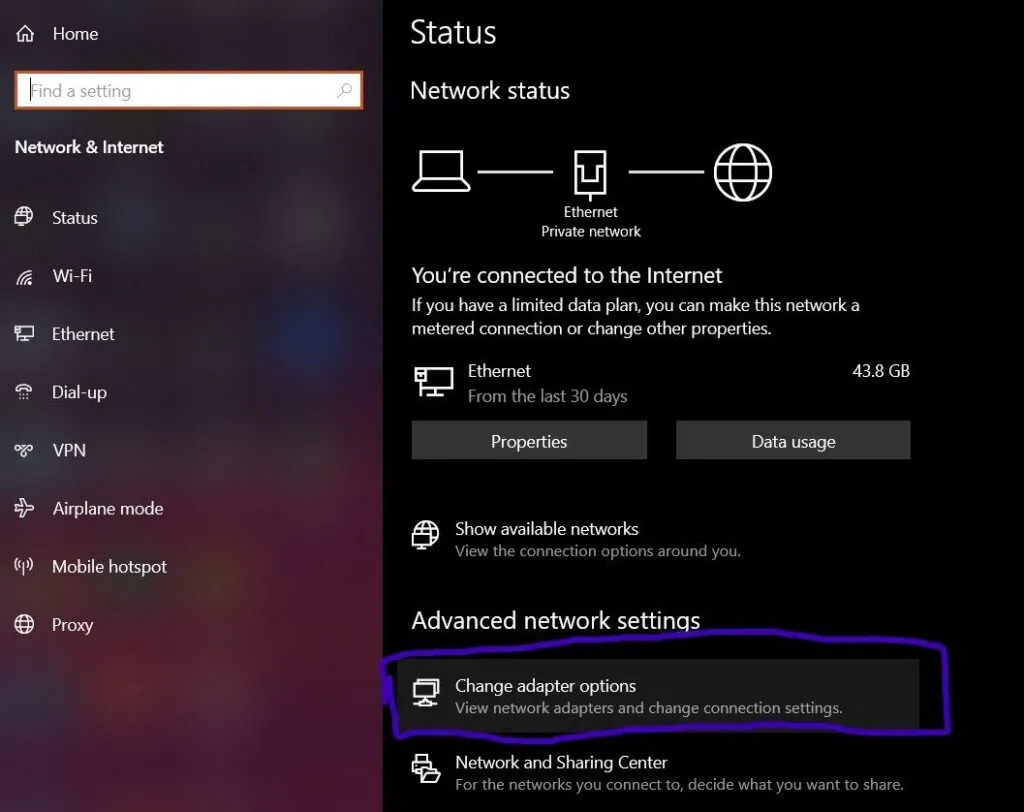
Now we need to tell your computer to actually use the server. On Windows, search for “Network Status” in the start menu.
Click on “Change adapter options.”
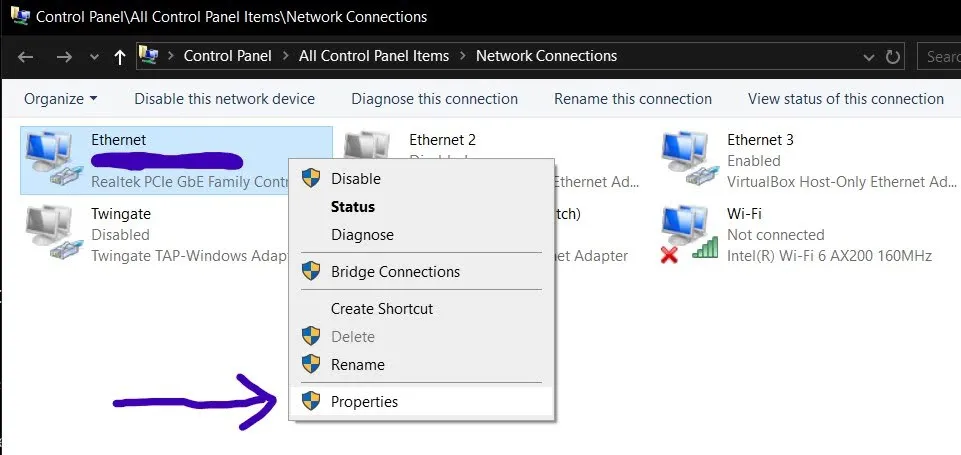
Find the connection you are using (like Ethernet or Wi-Fi), right-click it, and select “Properties.”
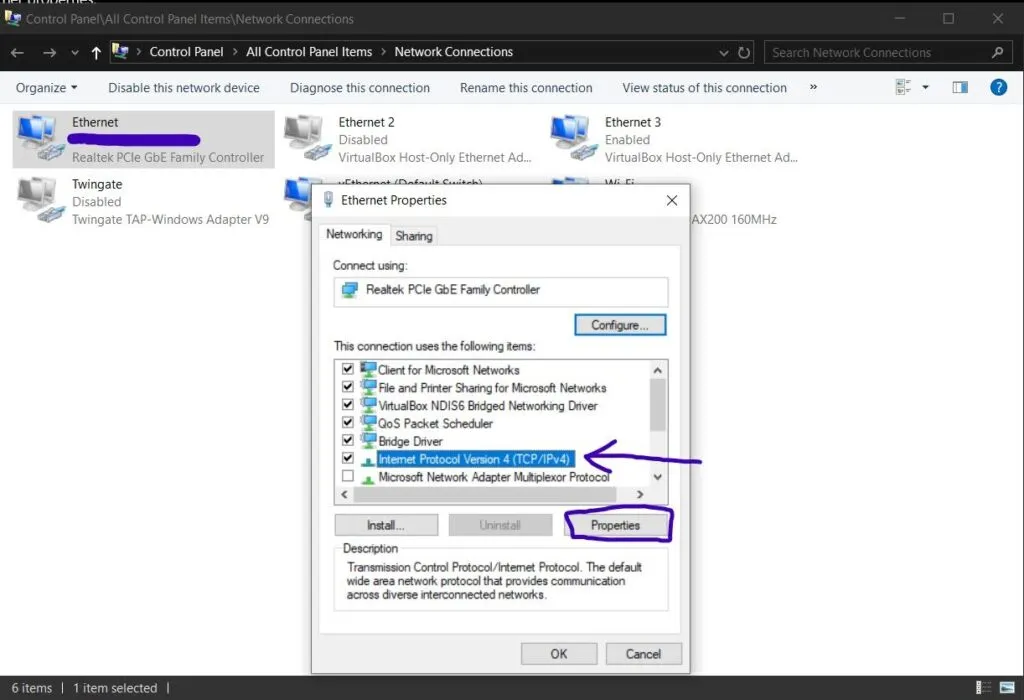
Find “Internet Protocol Version 4” in the list, highlight it, and click “Properties.”
Select “Use the following DNS server addresses” and enter the IP address of your server. You can leave the alternate DNS box empty.
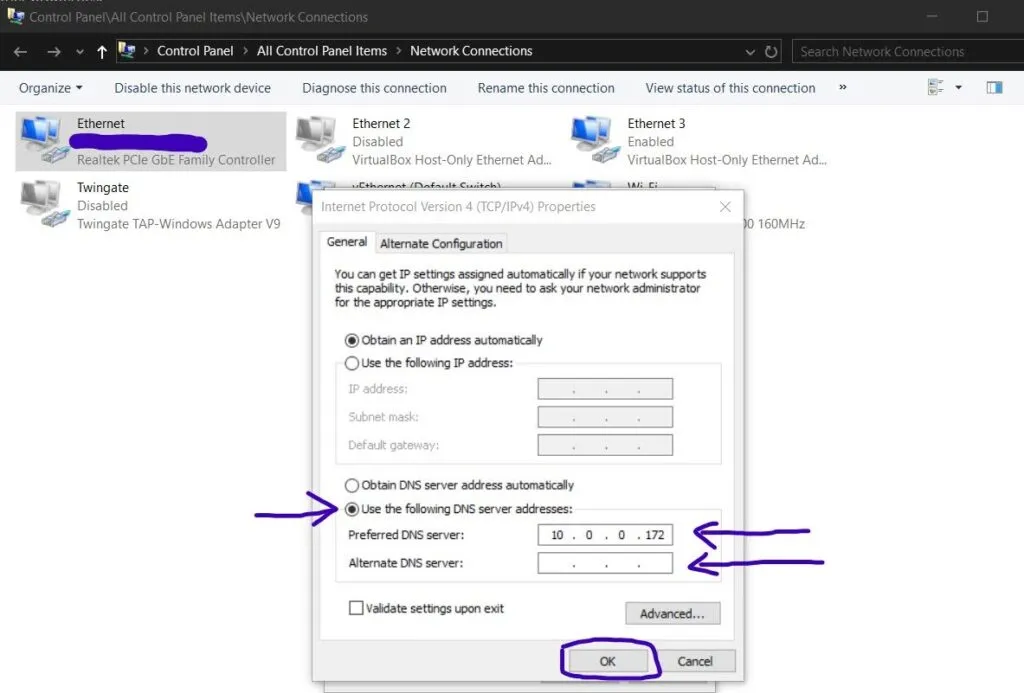
Hit “OK” and you are all set. Your computer is now using Pi-hole to filter out ads.
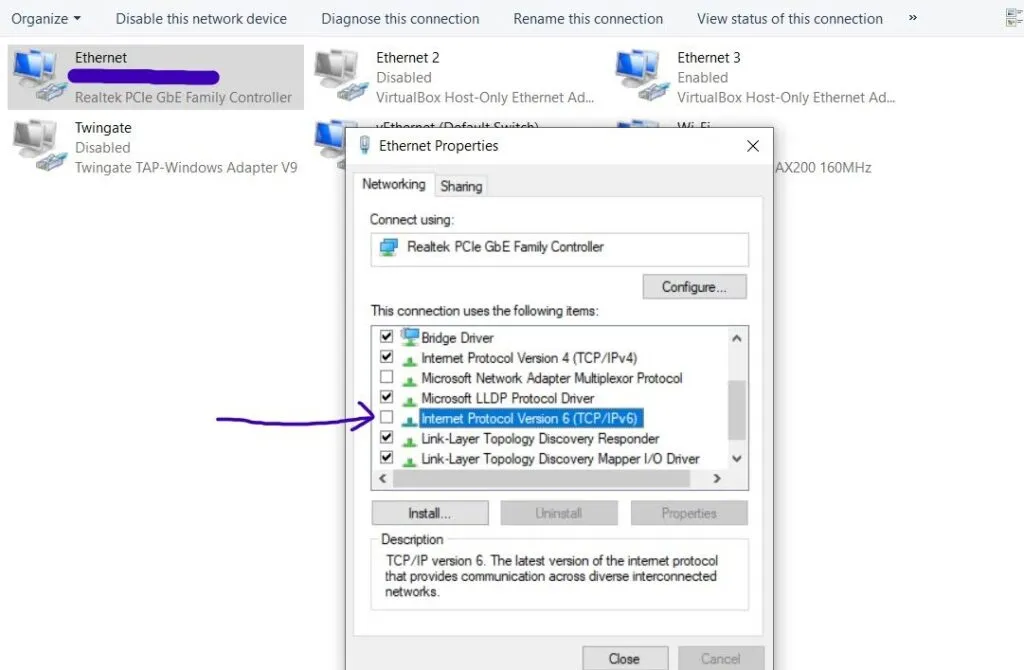
If Ads Still Appear
Sometimes routers try to be clever and assign a different DNS server through IPv6. This happened to me on my Xfinity router. If you are still seeing ads, go back to your network properties and uncheck “Internet Protocol Version 6” to force everything through IPv4.
The End
That should be it! Enjoy a much cleaner, ad-free browsing experience on your network.